

Think gluten-free cobbler topping is doomed to be gummy or crumbly?
You’re not alone, and it’s not true.
Most problems, like a soggy middle, pale top, rubbery bite, or powdery crumbs, have simple, immediate fixes you can do right now.
Check your oven temp, tweak hydration, or add the right binder.
This post walks you through fast fixes and smart swaps that actually work.
Read on to stop the guesswork and get a buttery-crisp, jammy-fruit cobbler everyone will reach for.
Immediate Fixes for Common Gluten-Free Cobbler Topping Problems
Most gluten-free cobbler topping failures look the same: soggy and pale, gummy in the middle, dense like a hockey puck, or so crumbly it falls apart when you scoop. Each one’s got a specific fix you can use right now or tweak before your next batch.
Start by checking your oven temp with a standalone thermometer. Most home ovens run 15 to 25 degrees off what the dial says. The standard bake for gluten-free cobbler topping is 375°F on the middle rack for 40 to 45 minutes, and that assumes your oven’s accurate and your fruit is bubbling hard across the whole surface, not just the edges.
When your topping looks wet after the full bake time, you’ve either got too much liquid in the dough or fruit juices flooding up from below. If the dough itself seems too wet before baking, stir in an extra tablespoon or two of your gluten-free flour blend until it holds together slightly better. If the fruit’s the problem, you need 1 to 2 tablespoons of cornstarch tossed with every 2 pounds of fruit before filling the pan. Let that fruit sit for 10 to 15 minutes so the starch can grab the juice, then bake. If your topping browns too fast on top but stays raw in the middle, tent it loosely with foil and keep baking another 5 to 15 minutes until the fruit bubbles vigorously and the topping springs back when you press it lightly.
Crumbly toppings that fall apart need more binding power. Add 1/8 to 1/4 teaspoon of xanthan gum per cup of total flour in your blend, or stir in one beaten egg or an extra tablespoon or two of heavy cream. Dense, heavy toppings come from compacting the dough or using coarse cornmeal instead of fine. Next time, use fine cornmeal, scoop the dough into 8 separate mounds instead of spreading it flat, and don’t press down. Gummy centers mean you either overmixed the dough or your flour blend already contains xanthan gum and you added more on top. Mix only until combined. If gumminess persists, cut any added binder in half or skip it entirely if your all-purpose gluten-free flour lists xanthan or guar on the label.
| Problem | Likely Cause | Immediate Fix |
|---|---|---|
| Topping is soggy or underbaked | Too much liquid in dough or wet fruit below | Add 1–2 tbsp flour to dough; toss fruit with 1–2 tbsp cornstarch; bake 5–15 minutes longer, tent with foil if browning |
| Topping is gummy or rubbery | Overmixing or excess binding gum | Mix until just combined; reduce or skip added xanthan if flour blend already contains it; lower oven to 350°F and extend bake |
| Topping is dense or heavy | Coarse cornmeal, compacted dough, or stale leavener | Use fine cornmeal; scoop into 8 mounds without pressing; replace baking powder if older than 6 months |
| Topping falls apart or crumbles | Insufficient binder or moisture | Add 1/8–1/4 tsp xanthan gum per cup flour, or stir in 1 beaten egg or 1–2 tbsp extra cream |
Understanding Flour Blends for Gluten-Free Cobbler Topping Success

Gluten-free cobbler toppings need at least three different flours to mimic the structure wheat flour gives you for free. The recommended trio is fine cornmeal, oat flour, and plain white rice flour. Each one plays a specific role.
Fine cornmeal adds a tender, slightly gritty crumb and a hint of sweet corn flavor, but on its own it bakes dense and heavy. Oat flour brings softness and helps the topping hold moisture without turning gummy. You can make it at home by processing old-fashioned rolled oats in a blender or food processor for about 5 minutes until finely ground. White rice flour lightens the whole blend and prevents that lead-weight texture you get when you use only cornmeal and oat flour together. Always check that your oats, cornmeal, and any starches are labeled gluten-free to avoid cross-contamination during milling.
When you need to adjust your blend to fix a texture problem, move slowly and make changes in 1 to 2 tablespoon increments so you don’t overcorrect. Adding a starch like tapioca or potato starch will increase crispness on the outside of your topping, which helps if your current recipe bakes up soft and cakey all the way through. If your topping’s too crumbly and dry, increase the oat flour slightly because it holds moisture better than rice flour or cornmeal. If it’s too dense, boost the rice flour to lighten the crumb. And if the texture feels gritty or sandy on your tongue, swap coarse cornmeal for fine. Coarse grains never fully soften during a 40 to 45 minute bake.
- Too dense or heavy: increase white rice flour by 1–2 tablespoons and reduce cornmeal or oat flour by the same amount.
- Too dry or crumbly: add 1–2 tablespoons more oat flour or stir in an extra tablespoon of cream.
- Gritty mouthfeel: replace coarse cornmeal with fine cornmeal, measure for measure.
- Lacks crisp edges: add 2 tablespoons tapioca starch or potato starch and reduce rice flour by 2 tablespoons.
Hydration, Binding Agents, and Structure in Gluten-Free Cobbler Toppings
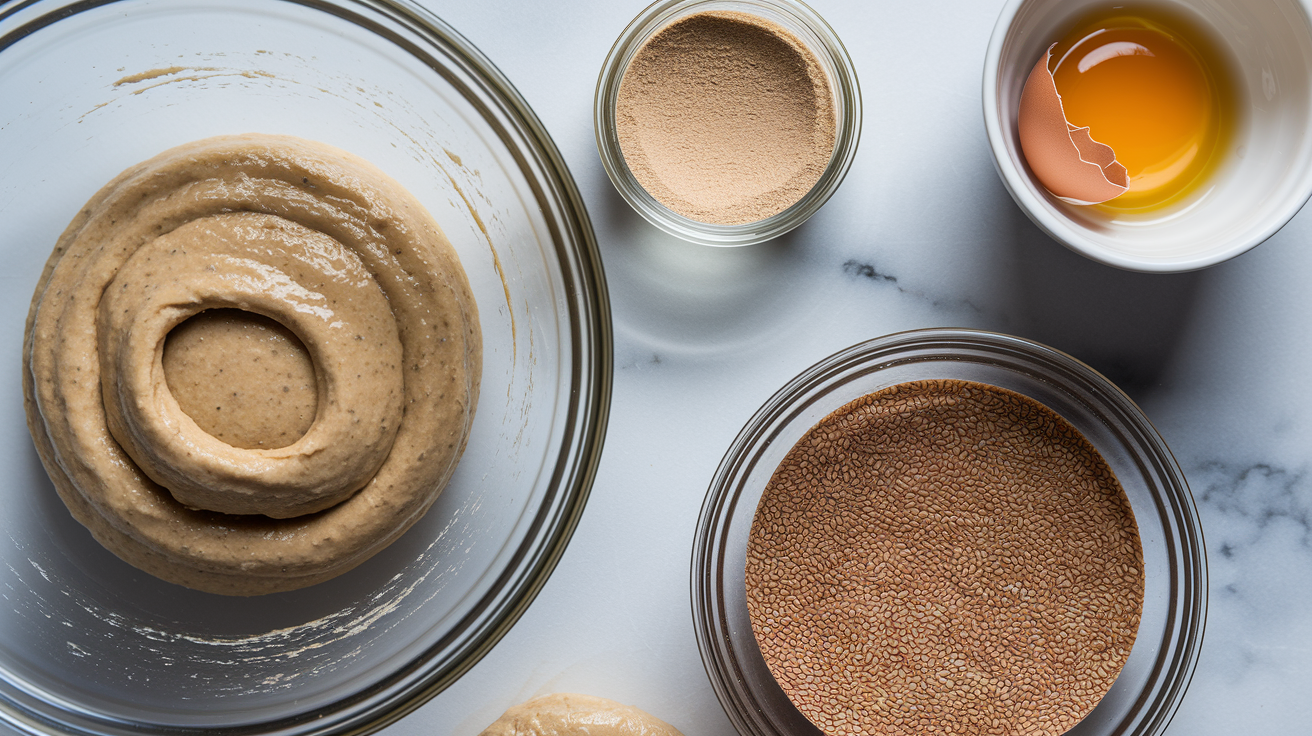
Gluten-free cobbler topping dough should look quite wet before it goes into the oven, almost like a thick cake batter instead of traditional biscuit dough. That wetness is normal. Gluten-free flours absorb liquid more slowly than wheat flour, and they need extra moisture to stay tender once baked. If your dough seems too loose to scoop into mounds, add a tablespoon of your flour blend at a time until it just holds a soft shape. If it’s stiff and dry, add cream or milk a tablespoon at a time until it loosens.
Letting the mixed dough rest for 10 minutes before scooping gives the starches time to hydrate fully, which improves both structure and texture in the finished topping.
When your topping lacks structure and falls apart or won’t hold together, you need a binding agent to replace the missing gluten. Xanthan gum is the most common choice, and the right amount is 1/8 to 1/4 teaspoon per cup of total flour in your blend. Start with 1/8 teaspoon and taste the result. Too much xanthan turns the crumb rubbery and unpleasant. If your all-purpose gluten-free flour blend already lists xanthan gum or guar gum in the ingredients, don’t add more or you’ll end up with that gummy, bouncy texture.
Eggs are another excellent binder and they also add lift and richness, so one beaten egg stirred into the wet ingredients will pull a crumbly topping together beautifully. For vegan or egg-free bakes, a flax egg or chia gel works nearly as well. Mix 1 tablespoon of ground flaxseed or chia seeds with 2.5 to 3 tablespoons of water, let it sit until thick and gel-like, then stir it into your dough.
Choosing the Right Binder
Use xanthan gum when you want a neutral flavor and you need just a little extra cohesion without changing the moisture level of your dough. It works best in drier doughs and in blends that don’t already contain a commercial gum.
Choose eggs when your topping needs both structure and lift, especially if the current version bakes flat or dense. Eggs contribute air and richness that gums can’t match.
Reach for flax or chia gel when you’re avoiding eggs and you want a binder that also adds a bit of moisture and a subtle nutty flavor.
Whichever binder you pick, measure carefully and add incrementally. It’s much easier to add a little more next time than to fix a batch that’s already gone rubbery.
Heat, Oven Positioning, and Browning Control for Gluten-Free Cobbler Toppings

The standard bake temperature for gluten-free cobbler topping is 375°F, and the pan should sit on the middle oven rack so heat circulates evenly around the fruit and the topping. If your topping browns too fast on top but stays pale or gummy underneath, your oven’s running hot or the rack is too high. Move the pan down one notch and consider lowering the temperature to 350°F, then extend the bake time by 10 to 15 minutes and watch for the fruit to bubble hard across the entire surface.
Tent the top loosely with foil as soon as it reaches your target color so it doesn’t burn while the center finishes cooking. If you’re using a convection oven, reduce the temperature by 25°F right from the start because the fan speeds up browning and can dry out the edges before the middle sets.
When your topping looks pale even after the full bake time, the oven may be running cool or the pan is sitting too low. Check the internal temperature of one of the biscuit mounds with an instant-read thermometer. It should read at least 200°F when fully baked. If it’s under 200°F, keep baking in 5 minute intervals until it hits that mark and the fruit juices thicken to a syrupy consistency.
For a quick browning boost at the very end, switch the oven to broil for 1 to 2 minutes and watch it closely so the sugar on top caramelizes without burning. Always rotate the pan halfway through baking if your oven has hot spots, and don’t open the door more than necessary because every peek drops the temperature and adds time.
- Lower the temperature to 350°F when the top browns in the first 20 minutes but the center stays raw or the fruit isn’t bubbling yet. Tent with foil and extend the bake by 10 to 15 minutes.
- Raise the temperature to 400°F for the last 5 minutes if the topping’s fully cooked inside but looks too pale on top. Or switch to broil for 1 to 2 minutes for fast browning.
- Maintain 375°F on the middle rack when the topping browns evenly and the fruit bubbles at roughly the same time, which means your oven’s calibrated correctly and your technique’s working.
Managing Fruit Moisture to Prevent Soggy Gluten-Free Cobbler Toppings

The biggest cause of soggy cobbler topping is runaway fruit juice flooding up through the dough during baking. Most fresh or thawed fruit releases a surprising amount of liquid when it heats, and gluten-free toppings don’t form the same moisture barrier that wheat flour batters do.
To stop that flood, toss about 2 pounds of prepared fruit with 1 to 2 tablespoons of cornstarch and 2 to 4 tablespoons of sugar, then let the mixture sit for 10 to 15 minutes before you add the topping. The cornstarch grabs the juice right away and the sugar pulls moisture out of the fruit cells so it thickens faster in the oven. If you’re working with especially juicy fruit like peak-season peaches or thawed berries, pre-cook the fruit in a saucepan over medium heat for 2 to 4 minutes, stirring gently, until the juices start to thicken and look syrupy. Drain off any excess liquid before transferring the fruit to your baking dish.
Shallow pans help fruit juices thicken faster because more surface area means more evaporation. A 9-inch pie pan will give you better results than a deep casserole dish when you’re battling wet fruit.
The primary visual cue for doneness is vigorous bubbling that you can see across the center and edges of the fruit, not just around the outside. If the fruit isn’t bubbling after 45 minutes, keep baking in 5 minute intervals until it does. That bubbling is the only reliable sign that the starches have activated and the juices have thickened enough to support the topping. Once the cobbler comes out of the oven, let it rest for at least 10 minutes so the juices finish setting up before you scoop into it.
- Toss fruit with 1 to 2 tablespoons cornstarch per 2 pounds of fruit before baking.
- Let sugared fruit sit 10 to 15 minutes to draw out and thicken juices before adding topping.
- Pre-cook very wet fruit for 2 to 4 minutes and drain excess syrup before assembling.
- Use a shallow 9-inch pie pan instead of a deep dish when fruit is especially juicy.
- Always bake until fruit bubbles hard across the entire surface, even if it takes an extra 10 to 15 minutes beyond the recipe time.
Mixing Techniques That Prevent Dense or Gummy Gluten-Free Cobbler Toppings

Overmixing gluten-free cobbler topping dough is the fastest way to end up with a gummy, rubbery crumb that feels more like a sponge than a biscuit. Gluten-free flours don’t develop gluten, but they do contain starches that gelatinize when you work them too hard with liquid, creating that unpleasant bouncy texture.
Mix your dry ingredients together first to distribute the leavener and any binding gum evenly, then pour in the cream or milk all at once and stir gently with a fork or spatula just until the dry pockets disappear. The dough should look lumpy and quite wet. Stop mixing the moment you can scoop a spoonful without seeing loose flour.
Portioning the dough into 8 separate mounds instead of spreading it flat across the fruit makes a huge difference in how the topping bakes. Each mound traps steam underneath, which helps it rise and develop a light, airy interior while the exposed tops and edges crisp up. If you press the dough down or try to smooth it into an even layer, you compact the structure and squeeze out the air pockets that make the topping tender. Use two spoons or a spring-loaded scoop to drop rough, uneven mounds directly onto the fruit. Resist the urge to flatten or tidy them up.
Proper Handling of Wet Gluten-Free Dough
Folding is gentler than stirring and introduces a little extra air into the dough without overworking the starches. Once your wet and dry ingredients are almost combined, use a spatula to lift the dough from the bottom of the bowl and fold it over the top a few times until everything just comes together. This motion aerates the dough slightly and keeps it from turning dense.
Never press or flatten the mounds once they’re on the fruit. Compacting the dough collapses any air you’ve incorporated and creates a heavy, tight crumb that won’t rise. Let the mounds sit tall and rough, and they’ll reward you with a topping that’s crisp outside and cakey inside instead of flat and leaden all the way through.
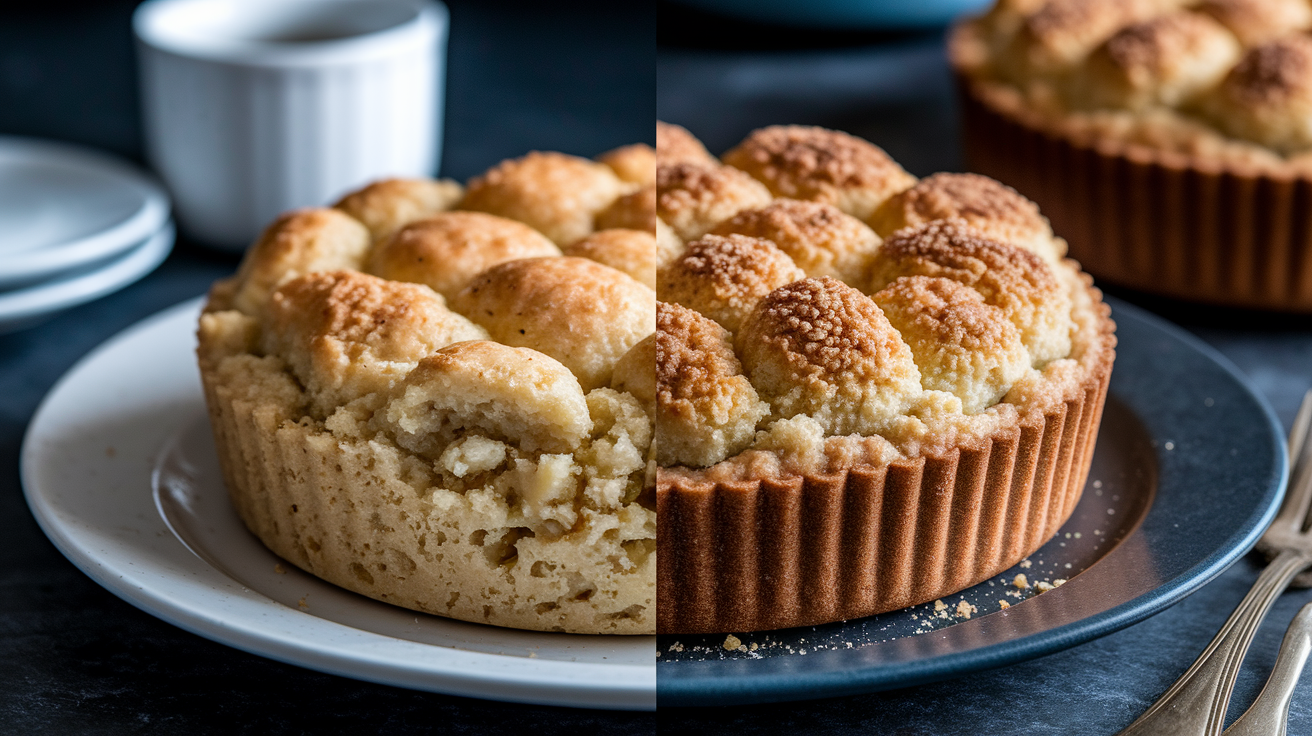
Visual and Physical Doneness Cues for Gluten-Free Cobbler Toppings

A fully baked gluten-free cobbler topping should be deep golden brown on top with a few darker spots where the sugar has caramelized, and the fruit underneath should be bubbling so hard you can see thick syrupy juices breaking the surface all the way to the center. If the top looks pale or the bubbling’s only happening around the edges, the cobbler isn’t done yet no matter what the timer says.
The edges of the topping will crisp up first and turn a richer brown than the center mounds. That’s normal. What you don’t want to see is a glossy, wet sheen on the dough or any patches that look raw and sticky, which means the starches haven’t set and the interior is still underbaked.
Press the top of one of the center mounds lightly with your fingertip. It should spring back immediately and feel firm, not wet or squishy. If your finger leaves a dent that doesn’t bounce back, the topping needs more time. For total confidence, slide an instant-read thermometer into the thickest part of one of the biscuit mounds. The internal temperature should read at least 200°F when the topping’s fully cooked through. A toothpick inserted into a mound should come out clean or with just a few moist crumbs, not wet batter.
The fruit itself should look thickened and jammy, not watery or soupy, and you should see steam rising from the bubbling juices when you pull the pan from the oven.
When you cut into the cooled cobbler, the cross-section should show a tender, slightly crumbly biscuit texture on top with crisp, browned edges and a soft interior that resembles cornbread or a light cake. The fruit below should be glossy and syrupy, clinging to the fruit pieces instead of pooling in a thin liquid at the bottom of the pan. If you see a layer of watery juice separating from the fruit or a gummy, translucent band where the topping meets the filling, the cobbler needed more bake time or the fruit needed more cornstarch.
A perfect gluten-free cobbler topping holds its shape when you scoop it, with distinct edges and a crumb that’s moist but not wet, and it tastes like a cross between a biscuit and a lightly sweet cake with a hint of corn.
Storage, Reheating, and Texture Restoration for Gluten-Free Cobbler Toppings

Gluten-free cobbler tastes best the day it’s baked, but leftovers will keep in an airtight container in the refrigerator for up to 4 days. The topping will soften as it sits because it absorbs moisture from the fruit, so don’t expect it to stay crisp.
When you’re ready to serve it again, reheat individual portions or the whole dish in a 325 to 350°F oven for 10 to 15 minutes until warmed through. Tent the top loosely with foil so it doesn’t brown further or dry out, then pull off the foil for the last 2 minutes and switch the oven to broil if you want to crisp up the surface again. A quick 1 to 2 minute broil will revive some of the crunchy texture on top, though it won’t be quite as good as fresh.
Never store cobbler uncovered or at room temperature for more than a couple of hours. The fruit can spoil and the topping will turn soggy from condensation. Let the baked cobbler cool completely before covering it, so trapped steam doesn’t make everything wet.
Freezing works for the filling but can make gluten-free toppings rubbery and dense when thawed, so it’s better to freeze the unbaked topping separately and add it fresh to reheated fruit. Cobbler’s always best served warm with a scoop of vanilla ice cream or a dollop of whipped cream, which helps mask any minor texture issues and adds richness that gluten-free bakes sometimes lack on their own.
| Storage Method | Duration | Texture Result |
|---|---|---|
| Airtight container, refrigerated | Up to 4 days | Topping softens; reheat to restore some crispness |
| Frozen, whole cobbler | Up to 2 months | Topping may turn rubbery; better to freeze unbaked topping separately |
| Room temperature, covered | 2 hours maximum | Topping goes soggy from condensation; fruit can spoil |
Final Words
Start by checking the top: it should be golden, the fruit bubbling, and the dough set without a glossy raw sheen. Those quick looks tell you what to fix.
We covered fast fixes (cornstarch for juicy fruit, foil tenting, extra bake time), flour-blend and binder options, oven position and mixing methods, and storage and reheating tricks.
Use these doneness cues and tips for troubleshooting gluten free cobbler topping, and you’ll have a warm, crisp cobbler that’s easy to love.
FAQ
Q: What are common mistakes when making gluten-free dough?
A: The common mistakes when making gluten-free dough are using the wrong flour mix, skipping a binder, over- or under-hydrating, overmixing, and not letting the dough rest for 10 minutes to hydrate.
Q: What are the most common mistakes when making peach cobbler?
A: The most common mistakes when making peach cobbler are failing to thicken the fruit so it’s soupy, underbaking the topping, baking at the wrong temperature, and letting the top brown too quickly.
Q: What are the common mistakes with gluten-free muffins?
A: The common mistakes with gluten-free muffins are overmixing the batter, using incorrect flour ratios, skipping a binder, having batter too wet or too dry, and baking at the wrong temperature.
Q: Why is my gluten free pastry falling apart?
A: The reason your gluten free pastry is falling apart is usually lack of binder, wrong flour blend, low fat, or too little hydration and rest. Add 1/8 to 1/4 tsp xanthan per cup or a beaten egg for immediate structure.
